2. Setting up the browser to draw pixels
(This article is part of a series. You can jump to the previous section or the next section if you would like to.)
In this section we will show how to use the <canvas> element to draw individual pixels on the screen. This will set the stage for drawing actual triangles - which we will do in the section after this one.
How to create a drawing surface
To be able to draw triangles in a browser window, we need a surface to draw on. This is provided by the <canvas> tag - a block element that can receive sizing parameters - both as element attributes, and via CSS styling. Why both?
The width and height properties of <canvas> define the number of pixels the canvas will contain - horizontally and vertically.
Most graphical applications use the value of the window.devicePixelRatio property to scale the pixel count of the canvas. This way the code can utilize high DPI hardware if you have that.
However, in this section we will instead set up a low resolution surface. We want each pixel to be large so that we can see what is going on when we draw triangles. We therefore use a custom devicePixelRatio value to specify the scale - and a value of 0.2 works well for our case.
const canvas = document.getElementById("canvas");
const devicePixelRatio = 0.2;

canvas.width = window.innerWidth * devicePixelRatio;
canvas.height = window.innerHeight * devicePixelRatio;
When we want to set the size of the element (the extents in the browser window) we use CSS. We want to use the full browser window, and JavaScript it can look like this:
canvas.style.width = window.innerWidth + "px";
canvas.style.height = window.innerHeight + "px";
Together, these code snippets set up a canvas element for us to work on. It covers the entire browser window and will have a resolution along x and y that is 20% of the native resolution for a normal-DPI screen. That means, one canvas pixel will cover 5 pixels in each direction, for a total of 25 pixels.
However, there is still something left. Browsers will in general try to improve low resolution graphics by smoothing out pixels. This means that anything we draw on our canvas would end up looking blurry. We want the opposite: We want to see sharp, boxy pixels on the screen. To achieve that, we style the <canvas> element with some CSS that tells the browser not to do smoothing:
<canvas id="canvas" style="image-rendering:pixelated;"></canvas>
Drawing the individual pixels
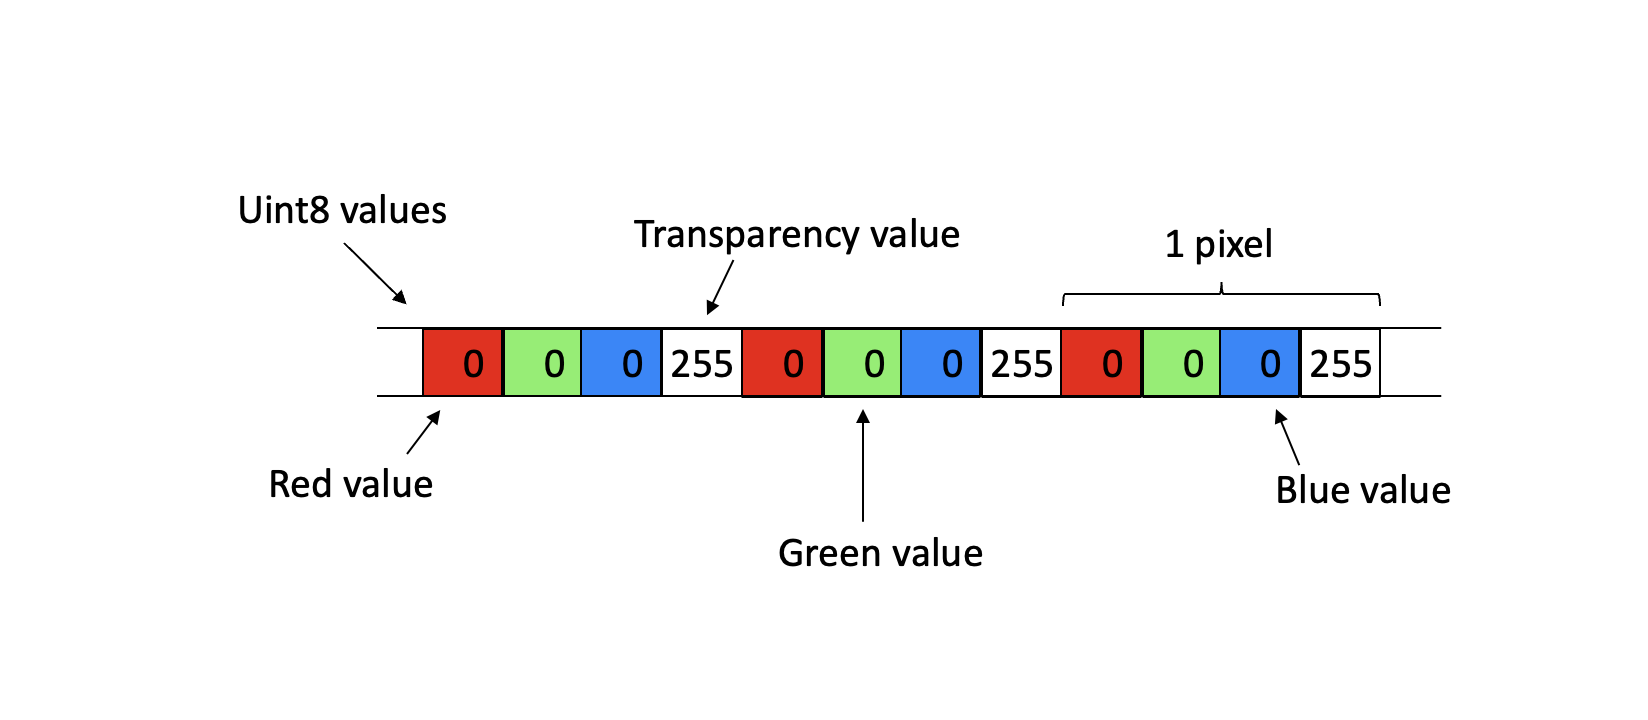
The canvas element object - that we can access from JavaScript - has an array that stores the color values for all the pixels it contains. The array consists of Uint8 (byte) values, 4 per pixel, one value for each of the red, blue, green and transparency (alpha) channels for that pixel.
The array is one-dimensional, so you cannot send it x and y values to update a pixel at a given location on the screen. To draw a pixel at a specific (x, y) location, we need to convert the x and y values to an array index that then will point to the right location in the array. This is how the conversion is done:
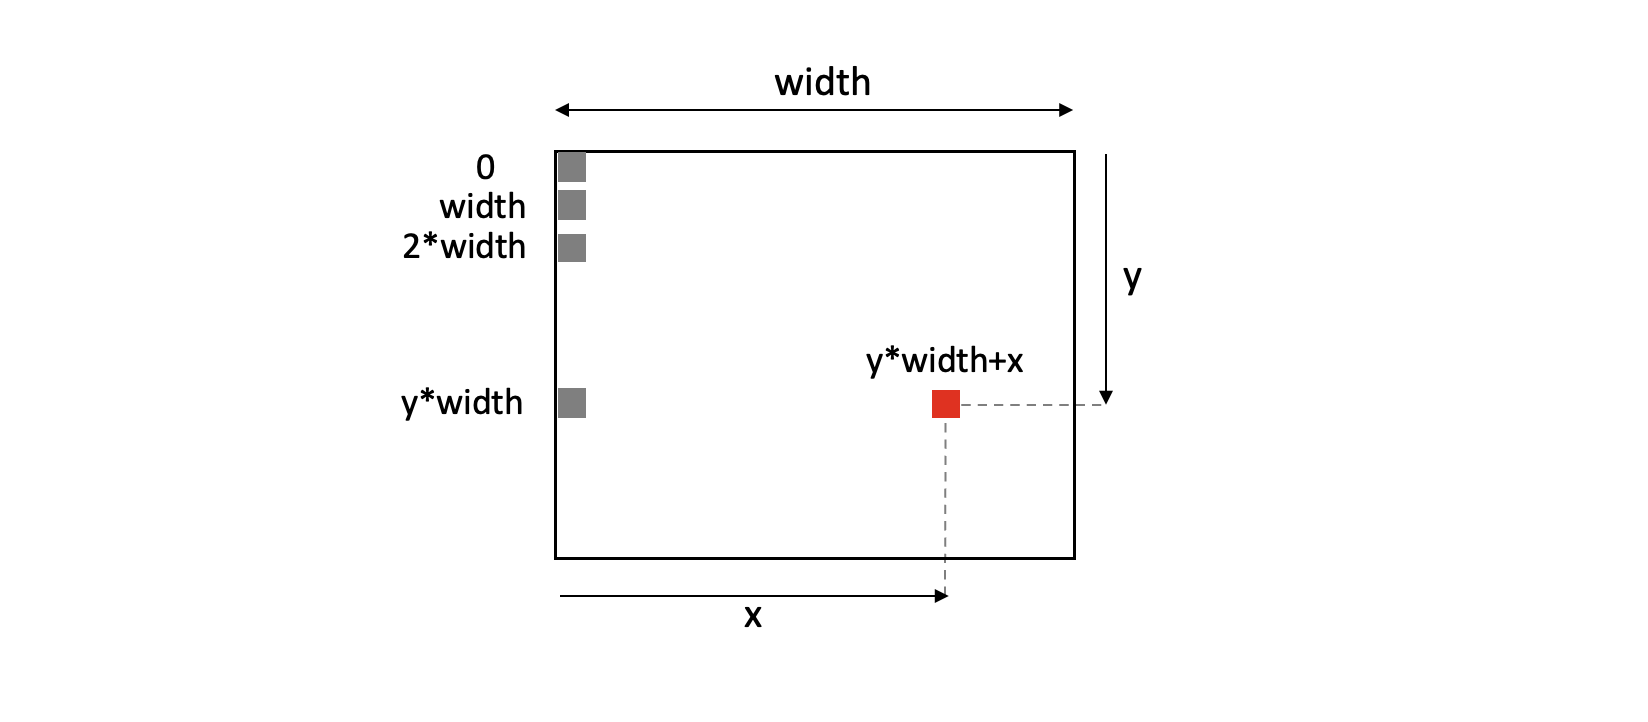
Note that in the canvas coordinate system, (0, 0) is the top left pixel. The x-axis goes to the right, and the y-axis goes downwards.
If the array contained one byte per pixel, the index would be y * width + x. However, as we have 4 bytes per pixel here, we will multiply that index value by 4.
At this array location we can start writing byte values after each other - red, green, blue and transparency values. The minimum value we can write is 0 (no intensity) and the maximum is 255 (full intensity). The resulting color of the pixel will be a mix of the three color intensities. (We will not use transparency here, and always assume a transparency value of 255 - an opaque pixel.)
When drawing, we will actually not write values directly to the canvas array. Instead, we will create a separate array (often called a buffer), draw on that, and then copy the buffer contents over to the canvas array. This way of doing things eliminates flicker that might otherwise appear if we draw directly to the screen while it is being refreshed.
We can avoid this by synchronizing our drawing with the screen refresh rate (60 times per second), but we will still use an intermediate buffer here. The reason is that it is more efficient to draw into a buffer that resides in RAM, and then send the full buffer to the GPU in one go, rather than sending lots of small updates directly to the GPU.
How do we create this buffer? First, we need to get the so-called drawing context for the canvas element:
const ctx = canvas.getContext("2d");
Then, we get hold of the buffer. Note that we need to specify a width and a height, which for us is the same as the pixel counts of the full canvas:
const screenBuffer = ctx.createImageData(window.innerWidth * devicePixelRatio, window.innerHeight * devicePixelRatio);
After having drawn the triangles we want (updated all the needed pixel values in the buffer), we put the buffer contents on screen. The two last parameters for that operation specify the pixel location in the canvas where the top left corner of the buffer should be placed. We will always use (0,0) here.
ctx.putImageData(screenBuffer, 0, 0);
And with that, we have all we need to start drawing triangles in the browser! Let’s do that in the next section.
In the mean time, you might want to look at the code for this section and some utility classes we will use.